City and Guilds Diary June 5th

I haven’t posted for a while, since I’ve had a friend from California staying for a few weeks and we’ve been doing lots of sightseeing and walking.  However, I have snatched an odd 10 to 15 minutes here and there to do a little to the second part of Chapter 8, making a variety of trimmings.  I’ve found these exercises great fun to do and I like the results.  We were asked to make three kinds of trimmings which we might use to decorate our final 3D item: ribbons, cords and toggles.

Ribbons

ribbon 1 (ho hum, yawn)

For my first ribbon, I started with a patchwork strip left over from the Seminole work earlier in this chapter.  I machined over it with white thread, but, although I tried altering the stitch and the spacing, it still looked boring.

ribbon 2

Next, I tried gathering fabric squares in the middle, to make a bow tie shape, and stitching them onto the strip at right angles.  This was more interesting.  To finish off I sewed various buttons over the  centre of each applied bow tie.
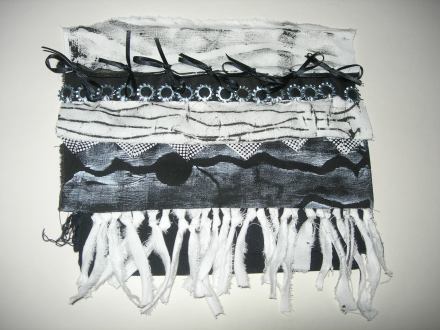
ribbons 1, 3 and 4

detail of ribbon 4

detail of ribbon 3

For the next two ribbons, I laid strips of various widths on top of each other, holding them together and decorating them with machine stitching.  As an added decoration, I hand stitched buttons onto one and metal washers onto the other. 

ribbon 5

For my fifth ribbon, I tied together little scraps and strips of fabric left over.  I quite liked the raggedy quality of this.

Cords

From left to right, the techniques used are:

  1. a simple fabric strip, knotted at intervals
  2. a bunch of several fabric strips twisted together and knotted
  3. a single strip of fabric, twisted and machine zig-zagged to secure.  I used a bought spotted fabric for this and I liked how the occasional black spot showed through the stitching.
  4. three twisted fabric strips plaited with the ends knotted to secure
  5. a fabric strip twisted and then machine zig-zagged to secure
  6. three strips twisted and machine stitched as in 5 above, then plaited together.

Toggles

toggle 1

The first toggle I made by simply rolling up a strip of fabric and stitching right through the middle to secure it.

toggle 2

The second toggle was made by folding a strip of fabric and knotting it.

toggle 3

Toggle 3 was made by laying three different fabrics together, folding and knotting as with toggle 2.

toggle 4

Toggle 4 was made by folding a strip of fabric lengthways then tying four knots, one on top of the other.

toggle 5

Toggle 5 was made by tying a monkey’s fist knot into a very long strip of fabric according to instructions in Good Housekeeping’s Step By Step Encyclopaedia of Needlecraft by Judy Brittain (Dorling Kindersley Ltd 1979).

leeks inspire a tassel


tassel inspired by leeks

Finally, chopping leeks gave the inspiration for a tassel made by cutting a fringe in the long edge of a strip of fabric, rolling it up, and tying a thread around the uncut edge to secure it.

Posted in Uncategorized | Leave a comment

City and Guilds Diary Thursday 10 May

It’s been a busy week so far, with very little spare time to do anything but think about the second part of chapter 8: making ribbons, cords, toggles and other decorative trimmings for our finished 3D item.  Then, while cutting up leeks for soup, inspiration struck. 

The shape of the leeks gave me an idea for a tassel.  I took one of the left over strips I had cut out of a Seminole piece and cut a fringe all the way along its length, about half its depth.  I then rolled it up and secured it by tying thread around the top.  It was interesting how the different fabrics and prints showed  in the fringe.

Next I tried a few ideas for ribbons.  I laid 3 strips of different widths together with the widest on the bottom  I stitched them together with a wiggly line of machine stitching, to echo the wiggly lines printed on the fabric.  I then sewed on buttons on one sample and washers on another to interpret my earlier drawing of a sea anemone.  The juxtaposition of wiggly lines and circles is one I find very interesting.  I am quite pleased with how they turned out.  I might try fraying the edges in one of the samples.  I like how the buttons and washers lift the design.  

The photograph isn’t good.  I forgot to place the samples on matt white card  as I usually do so the shine of the PVC cloth on the table (and the stains on it) detract from the image.  Also it was dark and I used flash which made too much contrast.  It is enough to record for myself in this diary, but I’ll photograph them again in daylight.

My third sample was two left over strips of Seminole work, attached end to end and then stitched with a variety of stitching, mostly altering the stitch length as I was sewing and I also used a scallop stitch which was on my machine to echo the scallop print on one of the commercial fabrics I used.  I felt it needed something more so pinked the edges with pinking shears.


Because I was working in short bursts through the day just whenever I had a spare minute or two, I didn’t take note of the time I spent, but I would guess it was about an hour and a half.

Posted in Uncategorized | Leave a comment

City and Guilds Diary Tuesday 8 May

I read in an old sewing book about a “channel seam”.  You baste your two pieces of fabric together with a fairly wide seam (about 2 cm) then press it open.  On the reverse side, you pin and baste a strip of contrasting fabric (right side down).  Then, on the right side, you stitch two narrow seams, equidistant from the first seam.  You then unpick the original basting.  What you are left with is two flaps covering a contrast material.  It sounded interesting so I tried it as what will be my final decorated seam in my sampler.

The channel seam is at the top.  I used two pieces of plain black fabric with one of my machine stitched strips for the contrast underneath.  I did a few hand stitches to hold the flaps alternately together and apart at intervals along the seam.  See detailed photograph.

Posted in Uncategorized | Leave a comment

City and Guilds Diary Monday 7 May

Image

Patchwork strip after second day

I had some more fun today, adding more decorated seams to my strip.  Here’s the complete strip as it is now.  I worked for about an hour then spent about another half hour photographing my work, transferring them to my computer and cropping them.  I was going to add more close-up details, but WordPress is playing up and refusing to do what I want it to, so I’ll skip them till I feel more up to battling with it, or I’ll post them on my Blogger blog (www.ceesew.blogspot.com).

From the top, the seams are:

  • French knitting stitched on after the seam was sewn to echo the wiggly lines on the patterned fabric
  • squares of fabric pinched in the centre, gathered up to form handkerchief points and trapped in the seam
  • lapped seam stitched with a decorative stitch and then frayed.  Like Carrie, I found it hard to fray the monoprinted fabrics since the acrylic paint glued the threads in place.  It worked with patience though on a piece that was not too densely printed.

Another very satisfying day (and still enjoying the wholemeal sourdough bread we bought yesterday – today with home-made courgette and rocket soup).  It’s nice when all the different strands of one’s life are simple, wholesome and done with love

Posted in Uncategorized | Leave a comment

City and Guilds Diary

I’m now working on Module 2, Chapter 8 of the Certificate in Embroidery.

I’m really enjoying this Module now.  I’m enjoying working in black and white and even enjoying the patchwork piecing!  Today I’ve been continuing with Chapter 8 “Not What It Seams”, where, as the name suggests, we have to make our seams interesting by decorating them in some way.  This was fun and gave lots of scope for being imaginative.  I spent a happy couple of hours pottering, starting on what will be a long strip patchwork block with all different interesting seams. 

Image

From the top:

  • a French seam, on the right side, padded with wool and gathered with narrow ribbon every inch or so, tied in a bow
  • washers hand-stitched on to the seam afterwards
  • squares of fabric, folded to points, trapped in the seam
  • knotted strips of fabric, trapped in the seam

I’ll try to think of some more ideas tomorrow.  Looking forward to it.

At first, I found some of the exercises in this module very labour intensive and tedious to do.  However, discovering Bryan’s wonderful website from Japan (www.japanesetextileworkshops.blogspot.com) and enjoying some delicious sourdough bread from the Crannach restaurant (and reading about breadmaking in Dan Lepard’s fabulous and inspiring book “The Handmade Loaf”) has given me a new appreciation for a labour-intensive, slow, patient and careful craft, done with love.  I’m learning to curb my impatience and work little and often, taking little bites at the task instead of trying to swallow it all at once.  I am really enjoying the route my life’s journey is taking at the moment.


Posted in Uncategorized | 1 Comment

Soap making


I made some soap today using an organic melt-and-pour glycerine soap base. I had fun doing a bit of experimenting with different essential oils to perfume it and also added vitamin E oil which is good for mature skins. The method is very easy. All you do is chop up the soap base, melt it in the microwave, add any perfume or other additives (eg oats makes a gently exfoliating soap) and pour it into moulds. I used Yeo Valley yoghurt cartons which gives just the right size and shape to be easy to use. I’ve been making my own soap for a few months now and I’ve noticed an improvement in my dry skin. It also makes nice gifts. I like using different essential oils for their therapeutic effect and also according to the likes of the user. My favourite is a blend of neroli, frankincense and lavender and for my husband I add cedarwood and marjoram to give a more masculine, woody and herby scent. I wish I could photograph the lovely perfume which is pervading the kitchen just now.

I was started off on this by a book which was a Christmas present (“Soaps” by Elaine Stavert, Guild of Master Craftsman Publications 2009). It is a good basic beginner’s book and gives ideas for experimenting on your own. I buy the materials online from either Aromantics http://www.aromantic.co.uk or The Soap Kitchen http://www.thesoapkitchen.co.uk  both of which have a variety of materials for making your own toiletries.   I’m thinking of buying other organic bases to make shampoo and body lotion with my own individual perfume blend. I am not fond of the amount of artificial chemicals which are added to commercial toiletries and it’s reassuring to be able to use a really nice gentle product when I know exactly what goes into it.

Posted in Uncategorized | 3 Comments

My other blog

I’ve decided to post my Distant Stitch City and Guilds course work on my other blog (http://www.ceesew.blogspot.com) because all the other students and the tutor have their blogs there and it just makes life simpler.  I’ll keep this blog for ideas, comments and other random thoughts …

Posted in Uncategorized | Leave a comment

Module 2 Chapter 5: Patterned Papers

In this chapter we were asked to produce a series of patterned
papers based on our drawings of animal markings. Three different types of
technique were used:

  • printing with a variety of media and objects
  • bleach on black paper
  • monoprints

Here are the results. Each individual sheet is numbered at the bottom right hand
side.

Printed papers

Bleached Papers

As before each individual page is numbered at the bottom right hand side. The page at the bottom right hand side is a repeat of the left hand one, flipped horizontally, just to make the arrangement more symmetrical. I didn’t have any black tissue paper, so just tried it with black cartridge paper which I had. Also I couldn’t find any ordinary bleach locally and was too tired after a recent virus to make the 64 mile round trip into the city, so used a toilet cleaner containing bleach.  Surprisingly, it seemed to work fine!

Monoprinted Papers

I wasn’t so happy with how the monoprints turned out. They look very pale and faded despite a bit of tinkering with the contrast in Photoshop! I think maybe I was too sparing with the printing ink since I had very little left and was trying to make it last.  Still, when combined with the other papers, they might make a useful mid tone.

Posted in Uncategorized | 3 Comments

Module 2 Chapter 4: drawing patterns from animal markings

I’ve also posted this on my other blog:

http:www.ceesew.blogspot.com

but thought I’d better post it here too in case my changing around has confused anyone who wants to see my blog.

This is my work for Chapter 4, where we were asked to make linear pen drawings of patterns from our research on animal markings.  Each image is numbered at the bottom of the right hand page.

Posted in Uncategorized | 1 Comment

Module 2 Chapter 3: Machined strips postscript

The inspiring sea-anemone

I wanted to depict the markings on the sea anemone, since I liked the combination of dots and lines.  Lines were easy with machine embroidery, but I was really puzzled how I could show circles in machine stitching without lowering the feed and using free machining (which we weren’t meant to do at this stage).  When things get difficult, I usually make a cup of tea.  Sitting sipping my tea, I was looking at the coaster which had been a present from an aunt (yes it’s a bit cheesy, but since that particular aunt is 96 years old and my very best friend in all the world, cheesy is fine by me).  I could see that the drops of water on the (pink!) leaf continued the lines on the surface of the leaf, but slightly magnified.  Light-bulb moment!

The inspiring coaster

 I thought if I drew circles on the wrong side of the strip in pencil then worked lines of stitches (on the back) in straight stitch, changing to a close zigzag stitch inside the circles, from the right side, the circles would be clearly seen in the different tones of the stitches.  I could also work it the other way, with the lines in close zigzag and the circles in straight stitch.  I tried both:

2.3.ps1 The machine stitched columns described above

 I am really quite pleased with how they turned out.


Posted in Uncategorized | 2 Comments